AWSに OpenShift Container Platform v4.19 を IPI で構築してみた
2025.10.29
- クラウド
- コンテナ技術
はじめに
皆さん、こんにちは。入社6年目のクラウド技術部のR.Aです。
コンテナ技術が注目されていくなかで、コンテナを実行する環境も検討しないといけないです。
今回はコンテナを管理できる OpenShift Container Platform v4.19 を AWS に IPI で構築する方法をお届けします。
OpenShift Container Platform の詳細については以下のブログをご覧ください!
クラウドネイティブ化のすすめ - OpenShiftという選択肢 -
コンテナの実行環境の比較については以下のブログをご覧ください!
ECS vs EKS vs ROSA(OpenShift)をまとめてみた
目次
- はじめに
- インストール方法について
- OpenShift Container Platformを構築
- 前提
- 手順
- 1-1. 作業PCで必要なパッケージをダウンロード
- 2-1. 作業PCからS3を作成
- 2-2. 作業PCからVPCを作成
- 2-3. 作業PCからEC2を作成
- 2-4. 作業PCからRoute53ホストゾーンを作成
- 3-1. 踏み台サーバにopenshift-installをインストール
- 3-2. 踏み台サーバにocをインストール
- 3-3. 踏み台サーバ上で公開鍵を作成
- 4-1. 踏み台サーバ上でinstall-config.yamlを作成
- 4-2. 踏み台サーバ上でマニフェストを作成
- 4-3. 踏み台サーバからクラスタをデプロイ
- 4-4. 作業PCからOpenShift Web Consoleに接続
- 5-1. 踏み台サーバからクラスタを削除
- 躓いた事象
- おわりに
インストール方法について
OpenShift Container Platformの基本的なインストール方法は、セルフマネージド型とマネージドサービス型に大別されます。
セルフマネージド型には、主に以下の2種類の方法があります。
- (1) IPI (Installer Provisioned Infrastructure)
- (2) UPI (User Provisioned Infrastructure)
この2種類に加え、マネージドサービスとして提供されているOpenShiftを利用する方法もあります。
- AWSの場合:Red Hat OpenShift Service on AWS (ROSA)
- Azureの場合:Azure Red Hat OpenShift (ARO)
これらマネージドサービスを利用する場合、インストール作業の多くをサービスプロバイダー側が担当するため、ユーザー側の作業はさらに簡略化されます。
(1) IPI (Installer Provisioned Infrastructure)
- OpenShiftのインストーラーが、クラスターに必要なインフラストラクチャー(仮想マシン、ネットワーク、ロードバランサーなど)を、クラウドプロバイダーのAPI経由で自動的に作成・プロビジョニングします。
- ユーザーはインフラストラクチャーの準備に手間をかける必要がありません。
- デプロイ作業が迅速かつ容易ですが、インストーラーが作成する構成(VPCのCIDRなど)にカスタマイズの制限を受けることがあります。
- 主にクラウドプロバイダー(AWS, Azure, GCPなど)や一部のベアメタル環境で使用されます。
(2) UPI (User Provisioned Infrastructure)
- OpenShiftのインストーラーを実行する前に、ユーザーがクラスターに必要なすべてのインフラストラクチャーをあらかじめ手動で準備しておく必要があります。
- インフラストラクチャーのネットワーク設定、ブートストラップマシン、ロードバランサーなどをユーザーが細かく管理・設計できます。
- 高度なカスタマイズが必要な環境や、セキュリティ要件が厳しい環境に適しています。
- 主にベアメタル環境や、特定の要件があるプライベートクラウド環境(例:vSphereなどのオンプレミス仮想化基盤)などで使用されます。
マネージドサービス(ROSA, ARO)
- Red Hat OpenShift Service on AWS (ROSA)
- Red HatとAWSが共同で提供・管理するOpenShiftサービスです。
- クラスターのインストール、アップグレード、パッチ適用といった管理作業の多くをRed HatとAWSが担当するため、ユーザーはアプリケーション開発に集中できます。
- Azure Red Hat OpenShift (ARO)
- Red HatとMicrosoft Azureが共同で提供・管理するOpenShiftサービスです。
- これらのサービスでは、インストール作業の多くをサービスプロバイダー側が担当するため、ユーザー側の作業は最も簡略化されます。
OpenShift Container Platformを構築
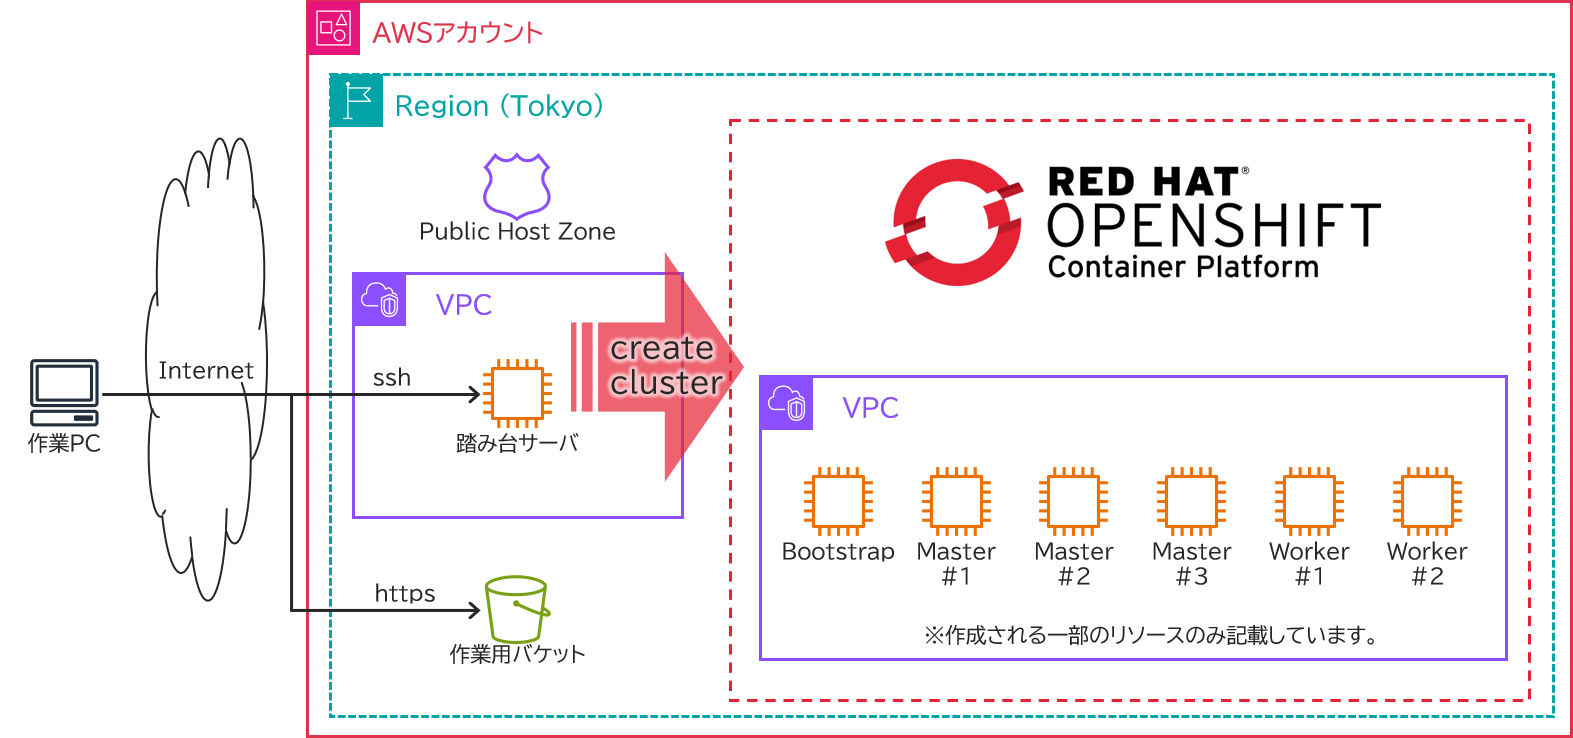
AWSに OpenShift Container Platform v4.19 を IPI で構築していきます。
前提
- AWSリソースを触れるIAMユーザを持っていて、AWSアカウントにログインできること
- AWSにいろいろ構築するため
- Red Hat Hybrid Cloud Console にログインできること
- パッケージをダウンロードするため
- ドメインを所有していること
- Route53のパブリックホストゾーンを作成する必要があるため
各種環境
- 作業PCは、Windows11です。
- AWSマネコンとOpenShift Web Consoleに触るために使用します。
- また、踏み台サーバに接続するためにも使用します。
- 踏み台サーバは、Amazon Linux 2023です。
- OpenShift Container Platform を構築するために使用します。
手順
- 事前準備
- 作業PCで必要なパッケージをダウンロード
- openshift-install (OpenShift Installer)
- oc (OpenShift Client)
- 作業PCで必要なパッケージをダウンロード
- AWS環境の構築
- 作業PCからS3を作成
- 作業PCからVPCを作成
- 作業PCからEC2を作成
- 作業PCからRoute53ホストゾーンを作成
- 踏み台サーバの設定
- 踏み台サーバにopenshift-installをインストール
- 踏み台サーバにocをインストール
- 踏み台サーバ上で公開鍵を作成
- クラスタの作成
- 踏み台サーバ上でinstall-config.yamlを作成
- 踏み台サーバ上でマニフェストを作成
- 踏み台サーバからクラスタをデプロイ
- 作業PCからOpenShift Web Consoleに接続
- クラスタを削除
- 踏み台サーバからクラスタを削除
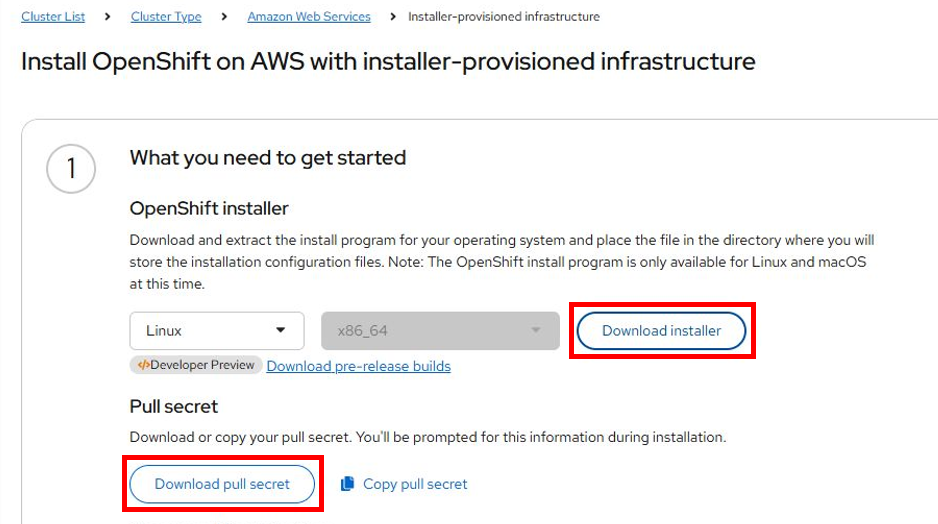
1-1. 作業PCで必要なパッケージをダウンロード
openshift-install (OpenShift Installer)
インストーラがダウンロードできるredhatの以下のURLにアクセスします。
ログインが求められる場合はログインしてください。
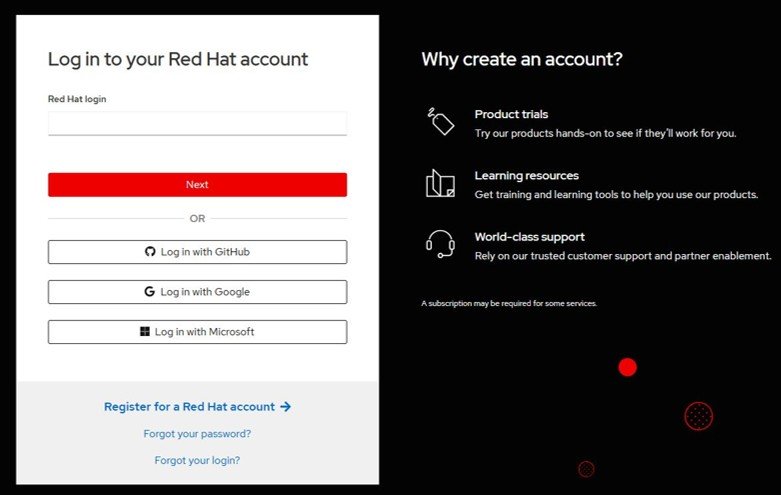
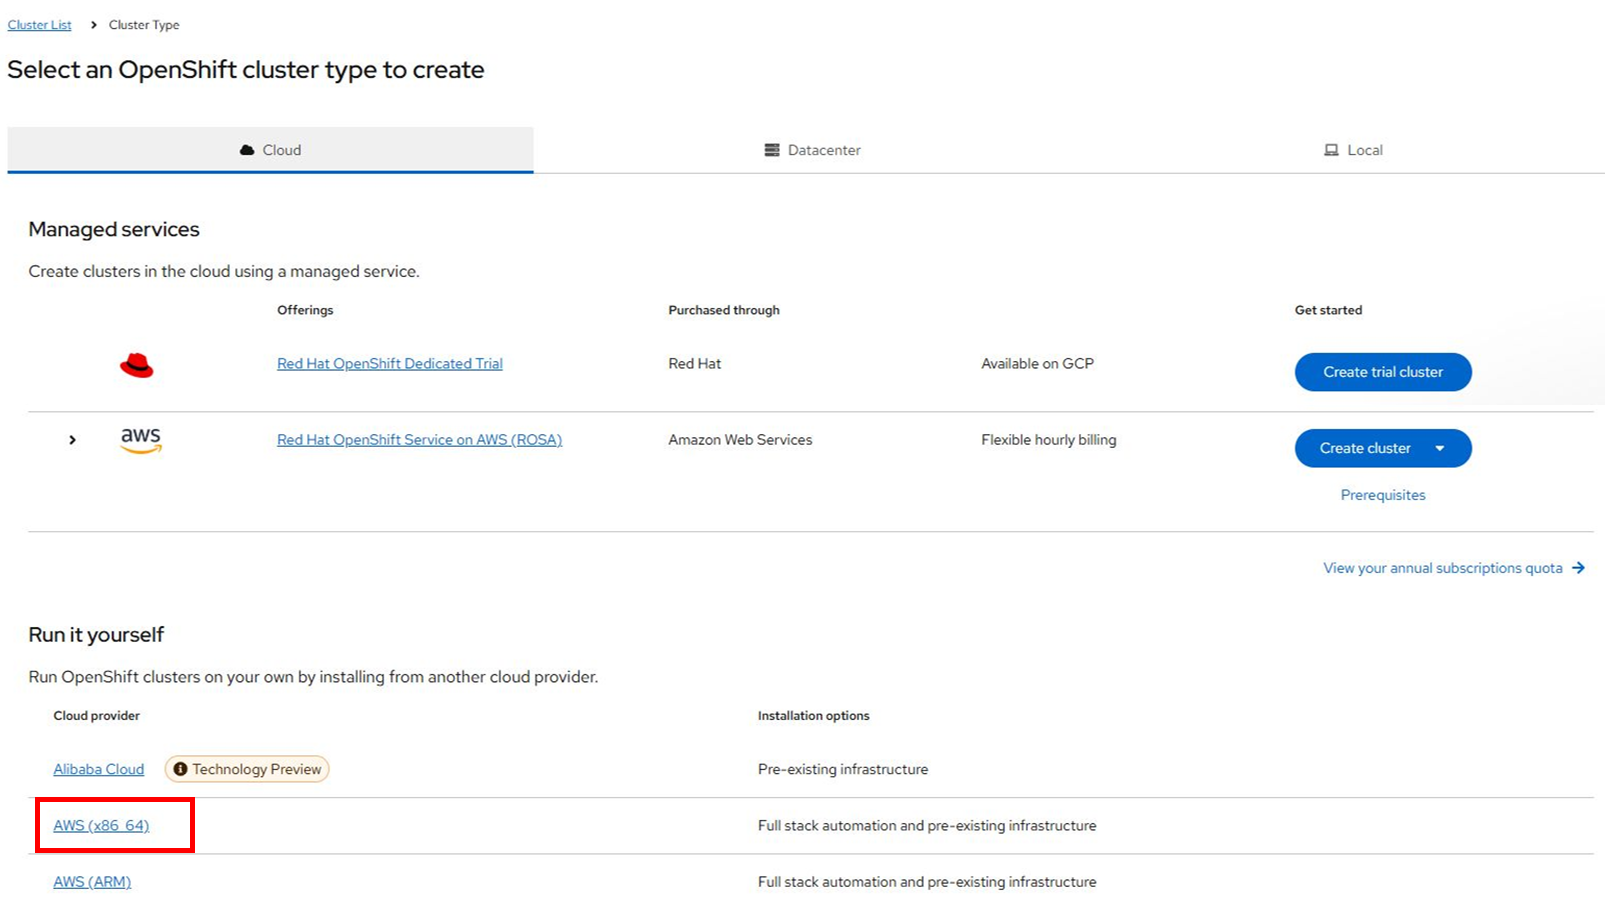
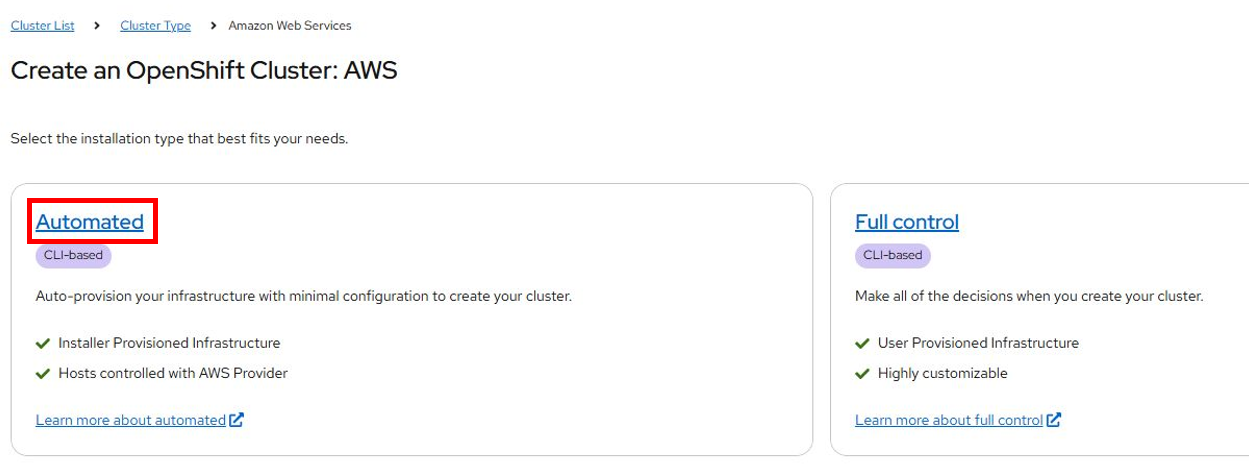
以下の写真の順に画面遷移してopenshift installerをダウンロードします。
同じ画面にあるpull secretも一緒にダウンロードします。(install-config.yaml作成時に使用します)

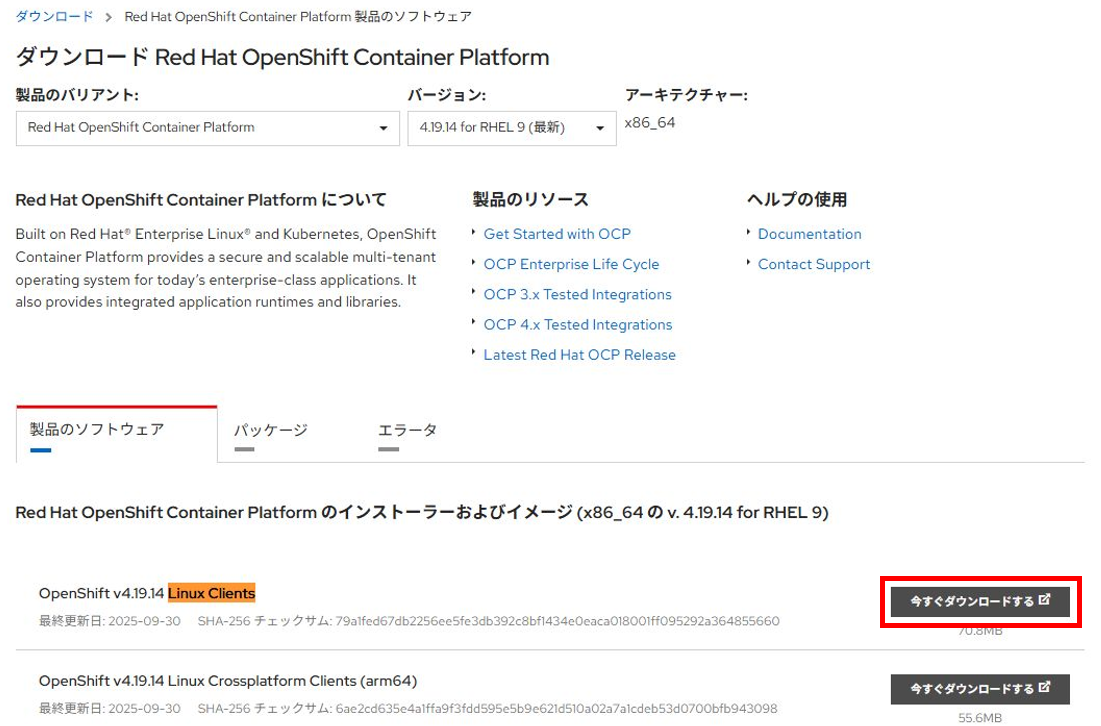
oc (OpenShift Client)
OpenShift Clientsがダウンロードできるredhatの以下のURLにアクセスします。
OpenShift v4.19.14 Linux Clients をダウンロードします。
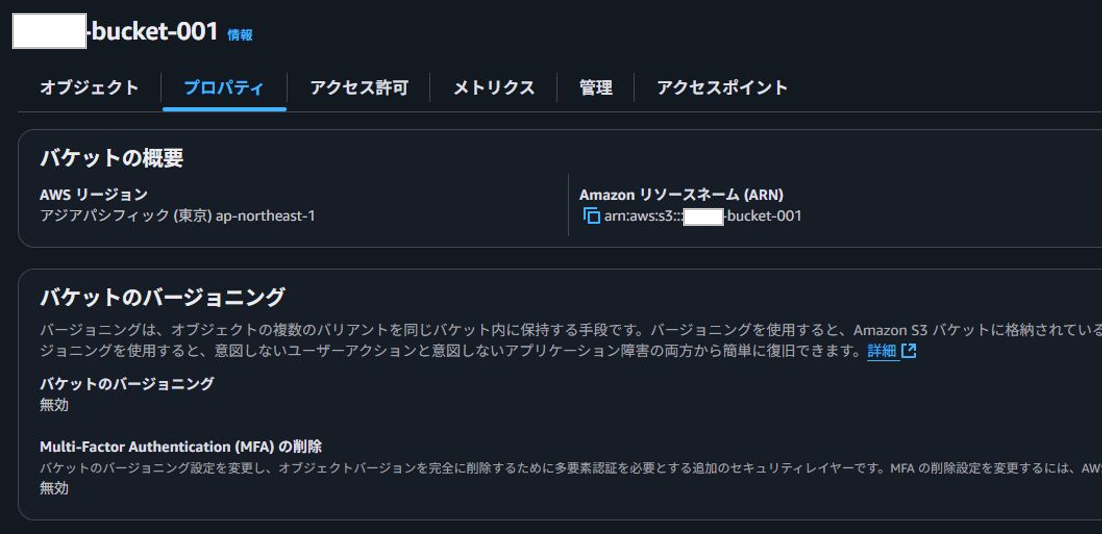
2-1. 作業PCからS3を作成
ダウンロードしたパッケージを作業PCからEC2へ連携するためのS3を作成します。
直接SCPコマンド等で連携する場合は不要です。
2-2. 作業PCからVPCを作成
踏み台サーバを配置するためのVPCを作成します。
OpenShift Container Platform が使用するVPCは手順4-3で自動構築されるため、CIDRは何でもOKです。

2-3. 作業PCからEC2を作成
踏み台サーバとして使用するEC2を以下の設定で作成します。
インスタンスプロファイルには S3 からダウンロードできるポリシーがアタッチされたIAMロールを指定します。

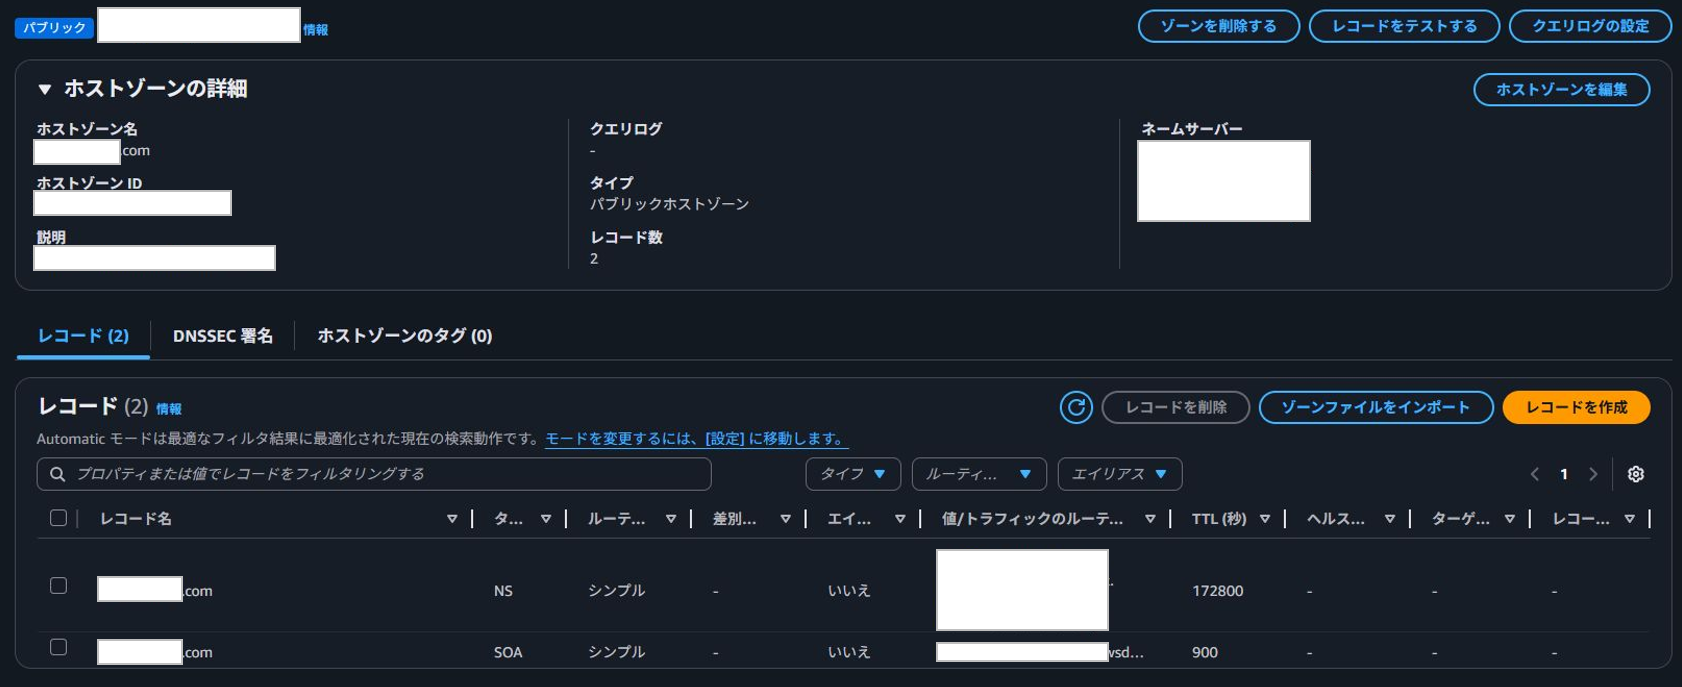
2-4. 作業PCからRoute53ホストゾーンを作成
OpenShift Container Platform のGUI提供のために使用するドメインをパブリックホストゾーンとして作成します。
3-1. 踏み台サーバにopenshift-installをインストール
3-2. 踏み台サーバにocをインストール
openshift-installとocをまとめてインストールします。
[ec2-user@ip-10-0-7-117 ~]$ mkdir tools
[ec2-user@ip-10-0-7-117 ~]$ ls
tools
[ec2-user@ip-10-0-7-117 ~]$ cd tools/
[ec2-user@ip-10-0-7-117 tools]$ aws s3 cp  s3://xxx-bucket-001/openshift-install-linux.tar.gz .
download: s3://xxx-bucket-001/openshift-install-linux.tar.gz to ./openshift-install-linux.tar.gz
[ec2-user@ip-10-0-7-117 tools]$ aws s3 cp  s3://xxx-bucket-001/openshift-client-linux-amd64-rhel9-4.19.14.tar.gz .
download: s3://xxx-bucket-001/openshift-client-linux-amd64-rhel9-4.19.14.tar.gz to ./openshift-client-linux-amd64-rhel9-4.19.14.tar.gz
[ec2-user@ip-10-0-7-117 tools]$ tar -xvf openshift-install-linux.tar.gz
README.md
openshift-install
[ec2-user@ip-10-0-7-117 tools]$ tar -xvf openshift-client-linux-amd64-rhel9-4.19.14.tar.gz
README.md
oc
kubectl
[ec2-user@ip-10-0-7-117 tools]$ ls
README.md  credentials  oc                                                 openshift-install
config     kubectl      openshift-client-linux-amd64-rhel9-4.19.14.tar.gz  openshift-install-linux.tar.gz
[ec2-user@ip-10-0-7-117 tools]$ cd
3-3. 踏み台サーバ上で公開鍵を作成
OpenShift Container Platform のクラスタに接続するための公開鍵を作成します。
[ec2-user@ip-10-0-7-117 ~]$ ssh-keygen -t rsa -b 4096 -f ~/.ssh/rei
Generating public/private rsa key pair.
Enter passphrase (empty for no passphrase):
Enter same passphrase again:
Your identification has been saved in /home/ec2-user/.ssh/rei
Your public key has been saved in /home/ec2-user/.ssh/rei.pub
The key fingerprint is:
SHA256:xxx ec2-user@ip-10-0-7-117.ap-northeast-1.compute.internal
The key's randomart image is:
+---[RSA 4096]----+
|                 |
|                 |
|                 |
|                 |
|                 |
|                 |
|                 |
|                 |
|                 |
+----[SHA256]-----+
[ec2-user@ip-10-0-7-117 ~]$
4-1. 踏み台サーバ上でinstall-config.yamlを作成
openshift-install create install-config コマンドを実行して対話形式でinstall-config.yamlを作成します。
※以下に記載するログに星マークで補足説明加えています。
今回はインスタンスタイプやワーカーノード数をデフォルトから変えたいので、対話形式で作成後にvimで編集します。
OpenShift Container PlatformのバージョンごとにAMIが異なるので、起動したいAMIは以下のURLから確認してください。
また、vimで書き換えた後にコピーを取得しているのは、この後実行するマニフェスト作成コマンドを実行するとyamlファイルが消えてしまうからです。
検証しなおすたびに毎回yamlファイル作成するのは大変なので、コピーを取っておきます!
[ec2-user@ip-10-0-7-117 ~]$ ~/tools/openshift-install create install-config --dir=./config
? SSH Public Key /home/ec2-user/.ssh/rei.pub ★3-3で作成した公開鍵を選択
? Platform aws ★awsを選択
INFO Credentials loaded from the AWS config using "EC2RoleProvider" provider
? Region ap-northeast-1 ★東京リージョンに作成するので、ap-northeast-1を指定
? Base Domain xxx.com ★2-4で作成したドメインを指定
? Cluster Name rei ★適当なクラスタ名を指定
? Pull Secret [? for help] ************************************************************ ★1-1でダウンロードしたpull secretを指定
INFO Install-Config created in: config
[ec2-user@ip-10-0-7-117 ~]$ ls config/
install-config.yaml
[ec2-user@ip-10-0-7-117 ~]$ vi config/install-config.yaml
[ec2-user@ip-10-0-7-117 ~]$ cp config/install-config.yaml .
[ec2-user@ip-10-0-7-117 ~]$ ls
config  install-config.yaml  tools
[ec2-user@ip-10-0-7-117 ~]$
参考 変更前のinstall-config.yaml
openshift-install create install-config コマンドを実行した直後のファイルです。
additionalTrustBundlePolicy: Proxyonly
apiVersion: v1
baseDomain: xxx.com
compute:
- architecture: amd64
  hyperthreading: Enabled
  name: worker
  platform: {}
  replicas: 3
controlPlane:
  architecture: amd64
  hyperthreading: Enabled
  name: master
  platform: {}
  replicas: 3
metadata:
  creationTimestamp: null
  name: rei
networking:
  clusterNetwork:
  - cidr: 10.128.0.0/14
    hostPrefix: 23
  machineNetwork:
  - cidr: 10.0.0.0/16
  networkType: OVNKubernetes
  serviceNetwork:
  - 172.30.0.0/16
platform:
  aws:
    region: ap-northeast-1
    vpc: {}
publish: External
pullSecret: '{"auths":"xxx"}'
sshKey: |
  ssh-rsa xxx
参考 変更後のinstall-config.yaml
yamlファイルの★が変更加えた部分です。
- 先述した AWS インフラストラクチャーの RHCOS AMI から東京リージョンのAMIを指定します。
- コスト削減のために、Workerの台数を3->2に減らします。
- UPIの クラスターのインストールに必要なマシン にWorkerは最小で2台と記載あり
- コスト削減のために、インスタンスタイプも最小にします。
- UPIの クラスターインストールの最小リソース要件 にMasterは4コア16GB, Workerは2コア8GBと記載あり
※執筆中に気づきましたが、Workerはm6i.large(2コア8GB)に縮小できましたね、、。
- UPIの クラスターインストールの最小リソース要件 にMasterは4コア16GB, Workerは2コア8GBと記載あり
zoneの指定は今回はaの1つだけですが、可用性を高めるために3行に分けてa, c, dと指定した方が良いです。
        zones:
        - ap-northeast-1a
        - ap-northeast-1c
        - ap-northeast-1d
additionalTrustBundlePolicy: Proxyonly
apiVersion: v1
baseDomain: xxx.com
compute:
- architecture: amd64
  hyperthreading: Enabled
  name: worker
  platform: ★
    aws: ★
      amiID: ami-0baf16f8c6bd53f63 ★
      type: m6i.xlarge ★
      zones: ★
      - ap-northeast-1a ★
  replicas: 2 ★
controlPlane:
  architecture: amd64
  hyperthreading: Enabled
  name: master
  platform: ★
    aws: ★
      amiID: ami-0baf16f8c6bd53f63 ★
      type: m6i.xlarge ★
      zones: ★
      - ap-northeast-1a ★
  replicas: 3
metadata:
  creationTimestamp: null
  name: rei
networking:
  clusterNetwork:
  - cidr: 10.128.0.0/14
    hostPrefix: 23
  machineNetwork:
  - cidr: 10.0.0.0/16
  networkType: OVNKubernetes
  serviceNetwork:
  - 172.30.0.0/16
platform:
  aws:
    region: ap-northeast-1
publish: External
pullSecret: '{"auths":"xxx"}'
sshKey: |
  ssh-rsa xxx
4-2. 踏み台サーバ上でマニフェストを作成
~/tools/openshift-install create manifests コマンドを実行してマニフェストを作成します。
作成すると3つのフォルダにたくさんのyamlファイルが生成されます。
参考までに今回生成されたマニフェスト群の構造を記載します。
[ec2-user@ip-10-0-7-117 config]$ ls
install-config.yaml
[ec2-user@ip-10-0-7-117 config]$ ~/tools/openshift-install create manifests
INFO Credentials loaded from the "default" profile in file "/home/ec2-user/.aws/credentials"
INFO Consuming Install Config from target directory
INFO Successfully populated MCS CA cert information: root-ca 2035-10-05T00:55:26Z 2025-10-07T00:55:26Z
INFO Successfully populated MCS TLS cert information: root-ca 2035-10-05T00:55:26Z 2025-10-07T00:55:26Z
INFO Adding clusters...
INFO Manifests created in: cluster-api, manifests and openshift
[ec2-user@ip-10-0-7-117 config]$ ls
cluster-api  manifests  openshift
[ec2-user@ip-10-0-7-117 config]$
参考 生成されたマニフェスト群のディレクトリ構成
treeコマンドの実行結果
[ec2-user@ip-10-0-7-117 config]$ tree .
.
├── cluster-api
│   ├── 000_capi-namespace.yaml
│   ├── 01_aws-cluster-controller-identity-default.yaml
│   ├── 01_capi-cluster-0.yaml
│   ├── 02_infra-cluster.yaml
│   └── machines
│       ├── 10_inframachine_rei-7jqsc-bootstrap.yaml
│       ├── 10_inframachine_rei-7jqsc-master-0.yaml
│       ├── 10_inframachine_rei-7jqsc-master-1.yaml
│       ├── 10_inframachine_rei-7jqsc-master-2.yaml
│       ├── 10_machine_rei-7jqsc-bootstrap.yaml
│       ├── 10_machine_rei-7jqsc-master-0.yaml
│       ├── 10_machine_rei-7jqsc-master-1.yaml
│       └── 10_machine_rei-7jqsc-master-2.yaml
├── manifests
│   ├── 90_cluster-mco-02-config.yaml
│   ├── cloud-provider-config.yaml
│   ├── cluster-config.yaml
│   ├── cluster-dns-02-config.yml
│   ├── cluster-infrastructure-02-config.yml
│   ├── cluster-ingress-02-config.yml
│   ├── cluster-network-02-config.yml
│   ├── cluster-proxy-01-config.yaml
│   ├── cluster-scheduler-02-config.yml
│   ├── cvo-overrides.yaml
│   ├── kube-cloud-config.yaml
│   ├── kube-system-configmap-root-ca.yaml
│   ├── machine-config-server-ca-configmap.yaml
│   ├── machine-config-server-ca-secret.yaml
│   ├── machine-config-server-tls-secret.yaml
│   └── openshift-config-secret-pull-secret.yaml
└── openshift
    ├── 99_cloud-creds-secret.yaml
    ├── 99_feature-gate.yaml
    ├── 99_kubeadmin-password-secret.yaml
    ├── 99_openshift-cluster-api_master-machines-0.yaml
    ├── 99_openshift-cluster-api_master-machines-1.yaml
    ├── 99_openshift-cluster-api_master-machines-2.yaml
    ├── 99_openshift-cluster-api_master-user-data-secret.yaml
    ├── 99_openshift-cluster-api_worker-machineset-0.yaml
    ├── 99_openshift-cluster-api_worker-user-data-secret.yaml
    ├── 99_openshift-machine-api_master-control-plane-machine-set.yaml
    ├── 99_openshift-machineconfig_99-master-ssh.yaml
    ├── 99_openshift-machineconfig_99-worker-ssh.yaml
    ├── 99_role-cloud-creds-secret-reader.yaml
    └── openshift-install-manifests.yaml

4 directories, 42 files
[ec2-user@ip-10-0-7-117 config]$
4-3. 踏み台サーバからクラスタをデプロイ
~/tools/openshift-install create cluster コマンドを実行してクラスタをデプロイします。
クラスタ作成に今回の構成だと40分程度かかるので、セッションが切れても実行され続けられるように以下のnohup コマンドとして実行します。
nohup ~/tools/openshift-install create cluster > ~/create_cluster.log 2>&1 &
大量のログが出力されるので一部だけ記載します。
[ec2-user@ip-10-0-7-117 config]$ nohup ~/tools/openshift-install create cluster > ~/create_cluster.log 2>&1 &
[1] 1976
[ec2-user@ip-10-0-7-117 config]$ jobs
[ec2-user@ip-10-0-7-117 config]$ ls
auth  metadata.json  terraform.platform.auto.tfvars.json  terraform.tfvars.json  tls
[ec2-user@ip-10-0-7-117 config]$
[ec2-user@ip-10-0-7-117 config]$ head -10 ~/create_cluster.log
nohup: ignoring input
level=info msg=Consuming Master Machines from target directory
level=info msg=Consuming Common Manifests from target directory
level=info msg=Consuming Openshift Manifests from target directory
level=info msg=Consuming OpenShift Install (Manifests) from target directory
level=info msg=Consuming Worker Machines from target directory
level=info msg=Credentials loaded from the "default" profile in file "/home/ec2-user/.aws/credentials"
level=info msg=Creating infrastructure resources...
level=info msg=Reconciling IAM roles for control-plane and compute nodes
level=info msg=Creating IAM role for master
[ec2-user@ip-10-0-7-117 config]$
[ec2-user@ip-10-0-7-117 config]$ tail -10 ~/create_cluster.log
level=info msg=Waiting up to 40m0s (until 3:14PM UTC) for the cluster at https://api.xxx.com:6443 to initialize...
level=info msg=Waiting up to 30m0s (until 3:14PM UTC) to ensure each cluster operator has finished progressing...
level=info msg=All cluster operators have completed progressing
level=info msg=Checking to see if there is a route at openshift-console/console...
level=info msg=Install complete!
level=info msg=To access the cluster as the system:admin user when using 'oc', run
level=info msg=    export KUBECONFIG=/home/ec2-user/config/auth/kubeconfig
level=info msg=Access the OpenShift web-console here: https://console-openshift-console.apps.xxx.com
level=info msg=Login to the console with user: "kubeadmin", and password: "xxx"
level=info msg=Time elapsed: 41m54s
[ec2-user@ip-10-0-7-117 config]$
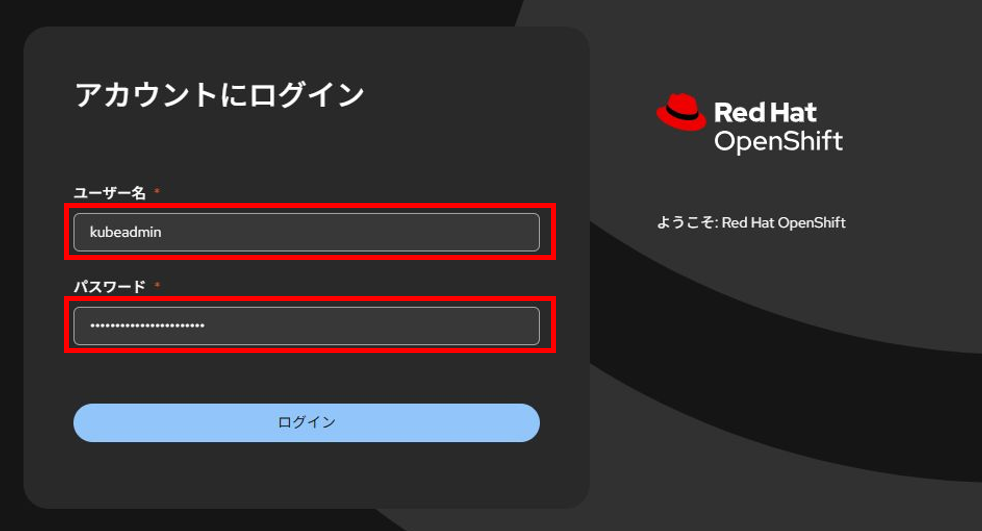
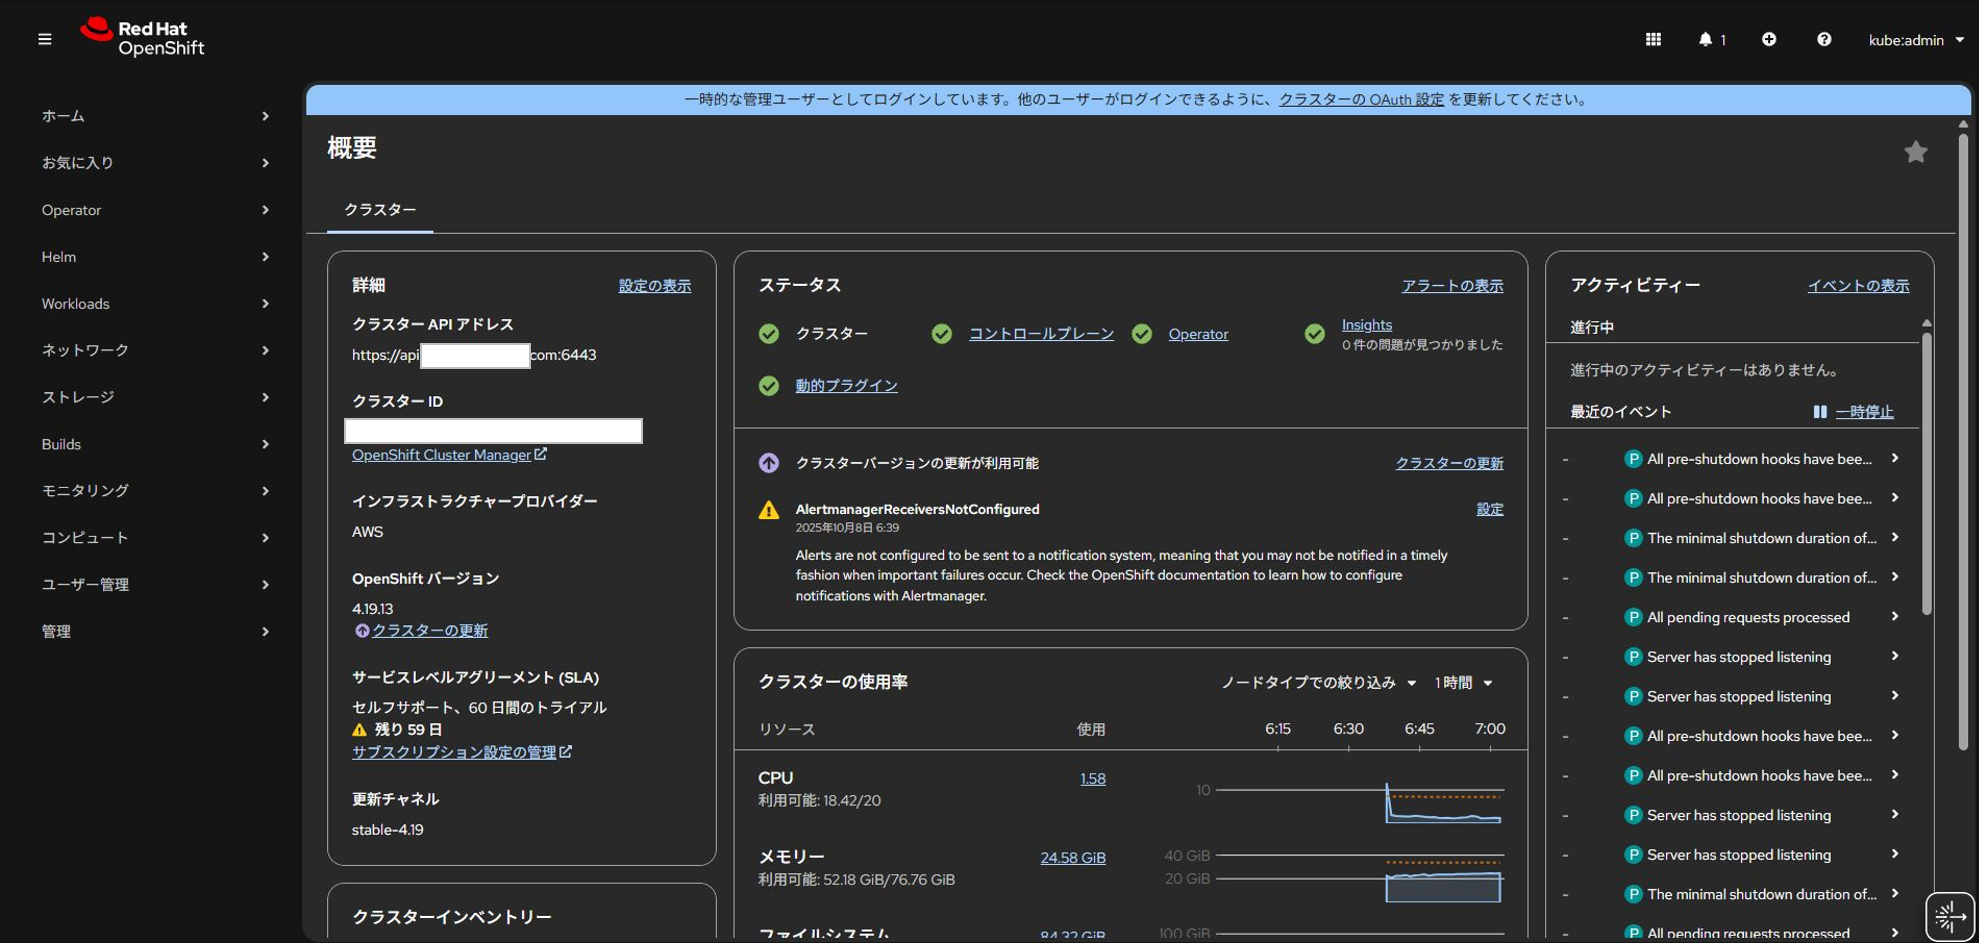
4-4. 作業PCからOpenShift Web Consoleに接続
手順4-3のログの最後に記載されているWeb ConsoleのURLを作業PCのWebブラウザにコピペし接続します。
ユーザ、パスワードもログの最後に記載されているので、それを使用してログインします。
5-1. 踏み台サーバからクラスタを削除
使用しなくなった場合は、~/tools/openshift-install destroy cluster コマンドを実行してクラスタを削除します。
今回の構成であれば削除にかかる時間は6分程度ですが、念のためセッションが切れても実行されるように以下のnohup コマンドとして実行します。
nohup ~/tools/openshift-install destroy cluster > ~/destroy_cluster.log 2>&1 &
[ec2-user@ip-10-0-7-117 config]$ nohup ~/tools/openshift-install destroy cluster > ~/destroy_cluster.log 2>&1 &
[1] 2002
[ec2-user@ip-10-0-7-117 config]$ jobs
[ec2-user@ip-10-0-7-117 config]$ ls
[ec2-user@ip-10-0-7-117 config]$ head -5 ~/destroy_cluster.log
nohup: ignoring input
level=info msg=Credentials loaded from the "default" profile in file "/home/ec2-user/.aws/credentials"
level=info msg=Terminated instance=i-xxx
level=info msg=Deleted id=xxx
level=info msg=Deleted id=rei-xxx-master-role name=rei-xxx-master-role policy=rei-xxx-master-policy
[ec2-user@ip-10-0-7-117 config]$ tail -5 ~/destroy_cluster.log
level=info msg=Deleted id=igw-xxx resourceType=internet-gateway
level=info msg=Deleted NAT gateway=nat-xxx id=vpc-xxx resourceType=vpc
level=info msg=Deleted id=vpc-xxx resourceType=vpc
level=info msg=Time elapsed: 6m30s
level=info msg=Uninstallation complete!
[ec2-user@ip-10-0-7-117 config]$
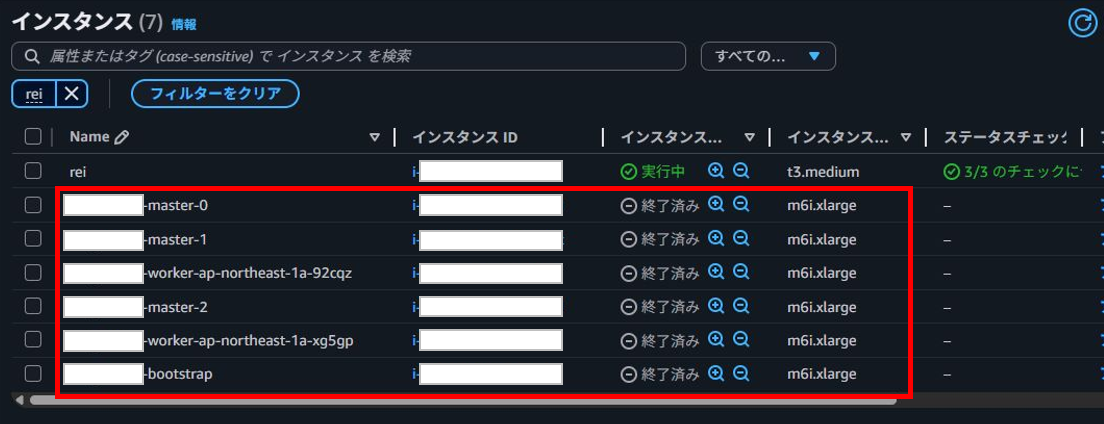
参考 クラスタが削除されたことを確認
AWSマネジメントコンソールからもクラスタが削除されたことがわかります。
EC2は削除直後はリストに載ってきます。
躓いた事象
マニフェストが作成できない
エラー
手順4-2のマニフェスト作成時に以下のエラーに遭遇しました。
default credentials modeの場合は、EC2にアタッチしているIAMロールやworkforce userの認証情報ではNGと言われました。
[ec2-user@ip-10-0-7-117 config]$ ~/tools/openshift-install create manifests
INFO Credentials loaded from the AWS config using "EC2RoleProvider" provider
INFO Consuming Install Config from target directory
INFO Successfully populated MCS CA cert information: root-ca 2035-10-05T00:21:58Z 2025-10-07T00:21:58Z
INFO Successfully populated MCS TLS cert information: root-ca 2035-10-05T00:21:58Z 2025-10-07T00:21:58Z
FATAL failed to fetch Openshift Manifests: failed to generate asset "Openshift Manifests": AWS credentials provided by EC2RoleProvider are not valid for default credentials mode
[ec2-user@ip-10-0-7-117 config]$
[ec2-user@ip-10-0-7-117 config]$ ~/tools/openshift-install create manifests
INFO Credentials loaded from the "default" profile in file "/home/ec2-user/.aws/credentials"
INFO Consuming Install Config from target directory
INFO Successfully populated MCS CA cert information: root-ca 2035-10-05T00:55:26Z 2025-10-07T00:55:26Z
INFO Successfully populated MCS TLS cert information: root-ca 2035-10-05T00:55:26Z 2025-10-07T00:55:26Z
FATAL failed to fetch Openshift Manifests: failed to generate asset "Openshift Manifests": AWS credentials provided by SharedConfigCredentials: /home/ec2-user/.aws/credentials are not valid for default credentials mode
[ec2-user@ip-10-0-7-117 config]$
回避策
同じAWSアカウントに作成したIAMユーザのアクセスキーを踏み台サーバに設定したところエラーが出なくなりました。
以下のコマンドを実行後に手順4-2のマニフェスト作成のコマンドを実行すればマニフェスト作成できました。
[ec2-user@ip-10-0-7-117 ~]$ aws configure
AWS Access Key ID [None]: XXX
AWS Secret Access Key [None]: YYY
Default region name [None]: ap-northeast-1
Default output format [None]: json
[ec2-user@ip-10-0-7-117 ~]$ ls .aws/
config  credentials
[ec2-user@ip-10-0-7-117 ~]$ cat ~/.aws/credentials
[default]
aws_access_key_id = XXX
aws_secret_access_key = YYY
[ec2-user@ip-10-0-7-117 ~]$ cat ~/.aws/config
[default]
region = ap-northeast-1
output = json
[ec2-user@ip-10-0-7-117 ~]$ aws configure list
      Name                    Value             Type    Location
      ----                    -----             ----    --------
   profile                             None    None
access_key     ****************XXXX shared-credentials-file
secret_key     ****************XXXX shared-credentials-file
    region           ap-northeast-1      config-file    ~/.aws/config
[ec2-user@ip-10-0-7-117 ~]$ aws configure list-profiles
default
[ec2-user@ip-10-0-7-117 ~]$
default credentials mode以外の認証モードでマニフェストを作成するようにすれば解決すると思いますが、今回は構築検証のため上記の回避策を採用しました。
おわりに
今回のブログでは、AWSでOpenShift Container Platformの構築手順を紹介しました。
躓いたところの認証モードについてはもう少し調査してみたいですね、、。
OpenShiftの機能や他の構築方法についても、これからどんどんブログで紹介していく予定ですので、ぜひお楽しみに!
最後までご覧いただきありがとうございました!
RELATED ARTICLE関連記事
RELATED SERVICES関連サービス

Careersキャリア採用


この記事をシェアする